Dr. Talbot’s Infrared Thermometer Review

Moms know that taking your child’s temperature the old school way with the thermometer under the tongue can be a nightmare. Do they really have it under their tongue? Did they lose their grip so that the reading is now inaccurate? Ugh. So much to worry about when you just want to know if your child has a fever. This is especially true in the age of COVID-19 when all moms are being extra cautious and are especially concerned about their child getting sick.

Even the thermometers that you stick in their ears can be a nuisance. It can be hard to tell if you’re sticking it in too far or not far enough. In the end, you just want an accurate reading so that you can know if you’re dealing with a feverish child.

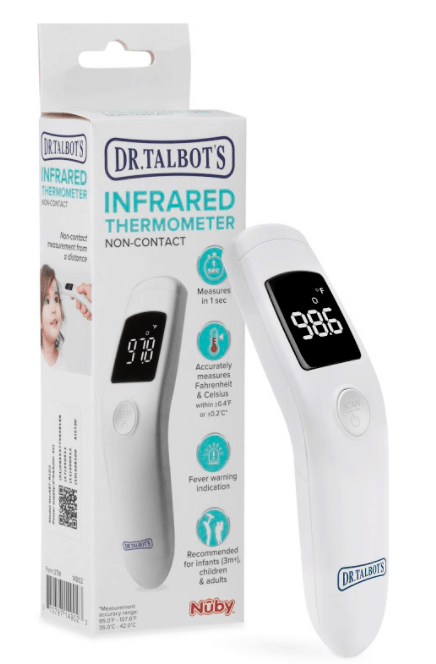
Enter Dr. Talbot’s Infrared Thermometer.

This thermometer is non-contact. That means you’re not sticking it in their mouth, ear, or anywhere else for that matter! It’s not only hygienic but also extremely easy to use. All you have to do is hold the thermometer 1.5 cm-5cm away from the forehead for one second to get a reading.

How to Use Dr. Talbot’s Infrared Thermometer

Turn the thermometer on by pressing the Scan/Power button. You’ll hear a beep then see the screen flashing that it’s ready to use. You’ll see a degree sign followed by the letter “F” or “C” for Fahrenheit or celsius.

Picture of Infrared Thermometer

Then, point the thermometer 1.5cm-5cm away from the forehead to take your child’s temperature. Release after just one second. You’ll hear a beep and then see the temperature reading on the screen. That’s it! 

When you’re done, just hold the Scan/Power button down for 5 seconds to shut it off.

It sounds hard to believe but it really is that simple! 

Putting it to the Test

After receiving Dr. Talbot’s thermometer in the mail, I couldn’t wait to give it a try. Knowing that everyone in my house was healthy and fever-free, we gave it a whirl to see how accurate it was. For years I’ve been using the thermometer that goes into the ear. As I mentioned above, this can be a nuisance because you never know if you’re doing it right. So, I was more than excited to just be able to aim this at my child’s forehead and get immediate results.

That’s just what I did! I took both my children’s temperature as well as my husband’s. The readings came back immediately and all showed no fever. There was no fuss when taking my children’s temperatures because it was quick and painless. It doesn’t get much better than that!

If there was a temperature of over 100 degrees Fahrenheit, I would have heard six consecutive beeps to alert me of a fever. If the temperature was over 108 degrees Fahrenheit I would have seen a “Hi” icon followed by two consecutive beeps. 

On the flip side, if a low reading was detected (below 89.6 degrees), two consecutive beeps would have followed as well as a “Lo” icon.

Picture of Infrared Thermometer

Since I didn’t see or hear any of these things, I knew we were in the clear. The thermometer advertises that it is accurate to within .5 degrees, so I felt confident with the results.

Another great feature is that it can recall the last 32 readings. So, if you took your child’s temperature a few hours ago and can’t remember what it was, you’ll still be able to find out with the thermometer. This is an extremely helpful tool for parents who are monitoring their child’s fever when they’re sick. There’s also a low battery indicator so you’ll know when to change the batteries and maintain an accurate reading.

Besides the accuracy, as I was using the thermometer, I noticed how lightweight it is and compact. When we finally get to travel again, I’ll surely be packing this in my bag because it takes up hardly any room and weighs practically nothing!

When it comes to an easy-to-use thermometer that is good for infants, children, and adults, this one from Dr. Talbot’s is it. 


Review: How Jenzy Makes Shoe Shopping Easier

Let’s face it, shopping for shoes for your kids can be downright painful. From finding shoes that fit to ones they actually like, it’s more like an Olympic sport than a fun afternoon out!

When you use one of those funky shoe measuring devices in the shoe store, you may often wonder if you’re even doing it right. Sure it seems like you’re measuring right, but then you go to put a pair of shoes in that size on your child’s foot and it doesn’t fit.

But, didn’t you just measure it?

By now your child has starting moaning and groaning and you’re just about ready to leave the shoe store without any shoes.

This little scenario has happened to me more than I like to admit. That’s why I was excited to try out the new Jenzy app.

What’s Jenzy?

Jenzy is a new app that will help size your child’s foot right at home. Once it gets the size, it will then recommend several shoes in that size. The shoes that are recommended are all well-made, high-quality shoes so you won’t be getting a pair of shoes that are bad for your child’s feet.

There are no funky measuring tools, no dragging your kids from store to store to find the right shoe in the right size. Just size, shop, and wait for the shoes to ship and arrive at your door.

I used the app to measure my daughter’s foot. I simply followed the instructions on the app that required me to snap a photo and use a credit card to help measure her foot. A few minutes later and with a few adjustments, the Jenzy app told me my daughter’s shoe size and then recommended several shoes in her size.

It was amazing that the app sized it perfectly to her current shoe size. Now, it was time to shop. We simply browsed through the choices until she found a pair that she liked, which really didn’t take long. With a few clicks, the shoes were ordered and were soon on their way.

Once the shoes arrived, she tried them on and they fit perfectly. She actually liked them too and said they were comfortable! Score for mom!  We now had a new pair of shoes, sized perfectly without any arguments or drama. When was the last time this happened? Oh yeah, never!

The Jenzy app took the stress and aggravation out of shoe shopping with my kids. You can’t put a price tag on that! I wouldn’t hesitate to use the Jenzy app again, especially when it comes to back to school shoe shopping! Anything that makes my life easier and avoids child drama means a good day all-around.

*I was compensated with a pair of shoes to complete this review. All opinions are my own. 


Review: Cave Tools Burger Press Patty Maker

*I was supplied with the product by Cave Tools for this review. All opinions are mine.

When you’re making burgers from hand one of the most difficult things to do can be to shape the burgers so that they stay in tact. So many times when you make them by hand they come apart by the time they hit the grill or pan on the stove. That’s where the burger press patty maker from Cave Tools comes in.

This handy dandy tool not only makes making burgers easier, but also makes them all the same size. It’s a win-win when making burgers for the entire family. After you mix the meat in the bowl, simply put the meat in the bottom part of the press. Use the indicator line to make 1/2 pound burger or the big 1/3 pound burger.

You can’t go wrong with whichever one you choose. From there, it’s as easy as pressing the top down to form your burgers. Don’t forget to use the burger papers the press comes with so you can get the burgers out easier and separate them.

When you cook the burger, it cooks evenly because it’s shaped perfectly and doesn’t come apart. A juicy burger is the end result of using this little tool. The burger press patty maker is a great addition to your kitchen tool collection if you like to enjoy fresh burgers. If you want to try out a burger press patty maker, Cave Tools is offering 15% when you use the code BURGER15 with your purchase. Just enter the code at checkout and you’re on your way to having better burgers!

Review: Red Gate Beauty LipSense & Lip Gloss

*This is a review of Red Gate Beauty products. I was provided the product to complete this review. All opinions are my own.

How many times have you put on lipstick in the morning only to have it completely erased before lunch? It’s rather annoying because no one has time to constantly reapply; yet you want to keep your lipstick on for more than an hour.  Did I mention the fact that cosmetics aren’t cheap? So when you do invest in products, you want them to get the job done.

That’s where Red Gate Beauty products come in. I recently had the opportunity to try out LipSense by Red Gate as well as the moisturizing shea butter based gloss. With 40 warm, cool and neutral colors to choose from there is something for every facial tone. I chose the “Bella” shade as well as the “glossy” lip gloss. The color is guaranteed to last 4-18 hours, so I put it to the test.

I applied it as recommended; one thin layer at a time for a total of three layers (waiting a few seconds in between each one). I noticed a big of a tingling sensation, but that’s normal with this product because of the denatured alcohol that creates a bacteria free environment in the tube. If you have dry lips, like me, you tend to feel it a little bit more. It does diminish within a few seconds, so don’t get scared.

The color went on smooth and I really liked it. It’s horrible when you like a shade in the store or online and then once you get it home, you’re disappointed. But, this was not the case with the LipSense. Since I liked the color, I went ahead and applied the gloss. What I loved about the gloss is that while it made my lips shine, it didn’t leave them feeling gooey. I’ve tried other lip glosses that have left my lips feeling sticky and actually on the gross side. But, not with the LipSense products.

After the products were applied, it was time to put them to the test. That meant a normal day of eating, drinking, wiping my mouth, etc. Through lunch and even through dinner time, the color did not disappear. While the gloss factor diminished, the color was still visible. There was no need to reapply. By the time I was ready to wash my face for bed (about 15 hours after applying); I could still see trace amounts of color! This was easily removable with some oil based makeup remover.

If you’re looking for a long-lasting lip product, give Red Gate’s LipSense products a try. Get a 15% discount when ordering online by using the coupon code bloggymoms15 at the checkout. You won’t be disappointed!

Review & Giveaway: KidloLand App

As a parent, we’re constantly looking for innovative ways to teach our children. Whether you love it or hate it, we all know technology plays a huge role in the way our children learn. Our kids are much more tech-savvy at three-years-old than we ever were!

With that said, the market is flooded with apps and games aimed at teaching our children. Some teach colors, others teach numbers; still others aim to do both while entertaining our kids at the same time. Trying to find an app that does everything isn’t always easy.

That’s where KidloLand comes in. KidloLand is an app that has it all. It not only has well-known kiddie songs and nursery rhymes, but also neat games to teach numbers, shapes, and even the months and days. It’s geared towards kids ages 0 to 5. I recently had my 4 year-old experiment with the app. She enjoyed the games focused on numbers, colors, and shapes. As a parent, I found the KidloLand app to serve as a fun reinforcement to some of the lessons she has already learned in pre-school. The numbers activity helps kids with numbers from 1 to 100, so it is great for all kinds of stages in your child’s life.

The months of the year and days of the week is also a wonderful addition, especially for the pre-Kindergarten set. One of the great things about the KidloLand App is that you can feel at ease that your child is using technology to help learn, not waste time. I wish I had it at my fingertips when my kids were younger!
If you want to see how the KidloLand App can help your kids on their learning adventure, here’s your chance! KidloLand is offering FIVE people a FREE three-month subscription for you and your child to try out.

Click below to enter the giveaway!

a Rafflecopter giveaway

You can download it at the Google Play Store or for your IOS devices.

*This is a sponsored post. I was provided with the product to complete this review. The views stated here are my own.

Review: Cave Tools Hamburger Press

There’s nothing like a good juicy burger. But, sometimes getting that at home can be a challenge. Pre-made hamburger patties are usually not very thick or very juicy. That’s why it’s better to make your own patties. They’re fresher, thicker, and taste better because you can add spices and anything else you want to customize your burger. A good hamburger press is essential to make those hamburger patties perfect. That’s where the Cave Tools Hamburger Press comes in.

meat 1

Unlike many products on the market, the Cave Tools Hamburger Press allows you to not only pre-make the patties, but also freeze them without losing shape. There’s no wrapping in tin foil or plastic wrap. You make them in the press and then stack the tray in your freezer.

I found this product extremely easy to use. I mixed my meat and then scooped it into the tray. After simply pressing down, I had six 1/3 pound square hamburger patties. There was no messy shaping. My piece of advice would be to make sure your hamburger meat is mixed properly. If not, there is a chance it can crumble. Nobody wants a burger that’s in pieces


meat 2

The burgers made by the Cave Tools Hamburger Press are so filling that you may even have left overs! One of the best things about this product is that it is dishwasher safe. After you take your burgers out, just pop the tray in the dishwasher. There’s no scrubbing or soaking. The tray comes out sparkling clean and ready for its next use.

If you want to try the Cave Tools Hamburger Press, you can use this Amazon coupon code for 15 percent off: LZEN8T4G.  It’s worth it! Happy hamburger pressing!


meat 3

Butler Boots Review

Kids and boots. They either love ’em or hate ’em. Sometimes they’re too clunky. Other times they don’t do their job…like protecting little feet from rain and snow.  Whatever the case, finding the right pair of boots for your child isn’t always easy.

boots3


That’s where Butler Boots come in. Your child doesn’t even need to take off his shoes. These rubber boots simply slip on over whatever shoes your child happens to have on. I recently had my kids try these on for size.

boots2

I found that sneakers worked best as the “base shoe” if you will. They were durable and had a straight bottom for the most part. The boot just slipped on over their sneakers. No drama. They were ready to take on Mother Nature…we all at least the puddles she was leaving behind!

These boots seemed comfortable for them. I didn’t hear any complaints! The most important part is that Butler Boots kept their feet dry. Butler Boots are a great alternative to regular rain boots. For my kids, I found that ordering a size up worked out best.

If you’re looking for something different in kids’ footwear, I would give Butler Boots a try!

*I was compensated with this product in order to conduct this review.


Review: Delta Temp 2 O Technology Shower Head

“Mommy, this water is too cold.”

“Mommy, this water is too hot.”

As a parent, how many times have you heard your child say this about their shower water? If you’re like me, the answer is one too many. No matter how hard you try it’s not easy to get the perfect water temperature. If you’re tired of playing the temperature guessing game, there’s a new shower head I recently tried out that makes things a whole lot easier.

The Delta Temp2O 6 Setting Shower Head has a very cool feature that takes the guess-work out of shower water temperature. An LED digital temperature display lets you know the exact temperature of the water. What’s even better is that the various temperature ranges are also color-coded.

So, as soon as you turn on the shower, you’ll most likely see the display in blue with a temperature reading.

Blue colored LED lets you know the water is cold

As soon as you start turning it up a notch, you’ll see the temperature rise digit by digit. You’ll also see the display change to a magenta color. This is usually the zone we’re in when my kids are in the shower. For us, this water is in the 80-90 degree range.

Magenta colored LED lets you know the water is warm

Magenta colored LED lets you know the water is warm

If you really want to turn up the heat…literally…you’ll see the display turn to red.

Red LED lets you know the water is hot

Red LED lets you know the water is hot

This water is extremely warm (over 100 degrees) and is probably not what you want to have for your child or for yourself for that matter. The great thing about this is if you or your child accidentally turns the temperature knob too much, the red display immediately lets you know the water is at one of its highest temperatures without anyone getting hurt by touching the water.

When I introduced the shower head to my kids, I let them know about the color-coded system right away. As a mom, this is the best feature. Now, even my four-year-old daughter knows not to get in if she sees the blue or red light.

“Mommy, we want the purple light. Right?” she asks me. You know you have a family-friendly product that does its job when even a four-year-old gets the idea.

While children can’t really enjoy the different shower head settings, adults certainly can. You can choose from Full Body, Full Spray with Massage, Massaging, Shampoo Rinsing, Shampoo Rinsing with Massage, and Soft Drench. The Massaging setting is a nice touch, especially if you’ve been picking up Barbie shoes or Legos all day long!

The Delta Temp2O 6 Setting Shower Head is a useful addition to your bathroom. The safety setting that the LED display provides makes it family-friendly and practical while the different shower head settings give an extra bonus for mom and dad.

*I was provided with this product from Delta to complete this review.


Review: Cave Man BBQ Tools Set

We all know how great it is to eat food on the grill. But, finding the right grilling tools is just as important as having the best BBQ recipe. Nothing is worse than losing some of your meal through the grates on your grill just because you don’t have the proper tools.

That’s where Cave Man Tools comes in. I recently tried out the High End BBQ Tools Set. The set comes with a BBQ spatula and fork as well as grilling tongs. All three tools are stainless steel which is great when it comes to cleaning them when you’re done grilling. They’re also heavy duty. No dollar store quality here! You know you’re working with some serious tools.

The quality of the spatula is an added bonus for flipping burgers. You don’t have to worry about your burger falling apart when you’re trying to cook it thoroughly. Hot dogs won’t roll all over the place when you use the fork. It is immensely strong for picking up meat off the grill.

As for the tongs, they come in handy when turning over meat like chicken. It not only makes it easier, but lessens the amount of flames that may arise when you turn your meat.

The best part is that when you’re all done, you can just throw them in the dishwasher. Gone is the time-consuming task of scrubbing each utensil clean.

If you’re looking for a durable BBQ set for yourself or for a gift, give the Caveman BBQ set a try. It’s definitely worth it!

*I was compensated with the product in order to complete this review.

Jamberry Nails Review

There is something about having my nails done that makes me feel good. Simply put it’s nice to look down at your hands and have them look pretty. As a mom, getting your nails done professionally on a regular basis is just not realistic. At least not for me. Ever since I get my mom crown I have to say that I paint my nails at home more often than I used to. It’s just easier and cheaper.

jamberry2But, sometimes you want something a little different. So, I tried Jamberry Nails custom wraps. I used the “Tinsle Town” design seeing that it was holiday time. The wraps come in a sheet of different sizes so you can match them up with the size of your nails. Once you find the right one, you have to heat up them up with a hair dryer and then stick them on your nails. Using a cuticle pusher you seal the wrap. Then, you need to trim the top with a scissor and file it down. Once you’re done with this step, you apply more heat and pressure so the wrap is securely fastened.

Presto! You have designer nail designs without the cost and time.

From start to finish, it took me forty minutes to finish my manicure. I had a harder time doing my right hand since I am not left handed. Once I got the hang of it though, I was able to move a lot faster. I definitely enjoyed the look of the design. But, after a couple of days I did notice they started to peel a bit, especially after I washed my hair in the shower and did some dishes. This was the only down side.

jamberry

All in all, I think this is a great alternative to paying for expensive designs, especially if you don’t have the time to sit in a salon for hours. I would use Jamberry nails again for a special occasion. Call me old fashioned, but I still like my old school nail polish for an everyday look.

*I was compensated with a set of Jamberry Nail Wraps to complete this review.